Merchant Guide
Shopping Cart
| amt | Amount to be paid |
| curr | Currency of the amount to be paid |
Wire Transfer Payments

All transactions made using this method will be automatically tagged as "PENDING" on our system. We need to receive an actual wire transfer from your clients before we change the status to "COMPLETED" or "DECLINED".
We will credit your wallet once we receive the wire transfer payment from your clients.
Implementation
There are two HTML pages required:
The Shopping Cart
The Process Page
Merchant Information
POST input hidden variables of the merchant as shown in the Merchant Settings.
| desc | Description of the merchant |
| MID | Merchant ID. The MID is a system-generated code that can be generated in the Merchant Setting found in the Dashboard. (Refer to Merchant Settings) |
| TID | Merchant Transaction ID. The TID is a unique, system-generated, alphanumeric string composed of 1-32 characters. This can be generated in the Process Page. |
| MWALLET | Merchant Wallet. The MWALLET is used to credit all payments using the Merchant Gateway. |
| SIGN | Signature. It is generated using sha256 by concatenating the input variables MID, amt, curr, desc, TID, MWALLET, and Secret Word, separated by the Separator. It is located in the Merchant Settings. For security, the Secret Word entered in the Merchant Settings is not passed to the gateway. For the Secret Word and Separator, please refer to Merchant Settings. |
| choice |
Shows payment option (Optional defaults to 1 which is true).
The variable choice is an optional parameter to show either the payment selection, PayCo, or Credit Card. An entry of 1 (default) shows the payment selection. If you did not pass this variable it will always default to 1. If you pass the variable choice as 0, and the settings in the merchant to Accept Credit Card is set to Yes, payment to PayCo gateway will direct to credit card input. |
The Merchant Gateway follows this process:

Shopping Cart

Process Page
PayCo Gateway
Using Callback Pages
Callback pages are the pages where the merchant performs the return process.
There are three required Callback Pages:
| 1. The RETURN URL | When a payment is successful using PayCo Merchant Gateway, the RETURN URL is used to redirect the page where the merchant requires. |
| 2. The CANCEL URL | When a payment is cancelled, the CANCEL URL is used to redirect the page to the merchant Cancel Page. |
| 3. The STATUS URL | Prior to successful payment, a post-process is performed and posted to STATUS URL to confirm successful payment. |
There are four results that can take place:
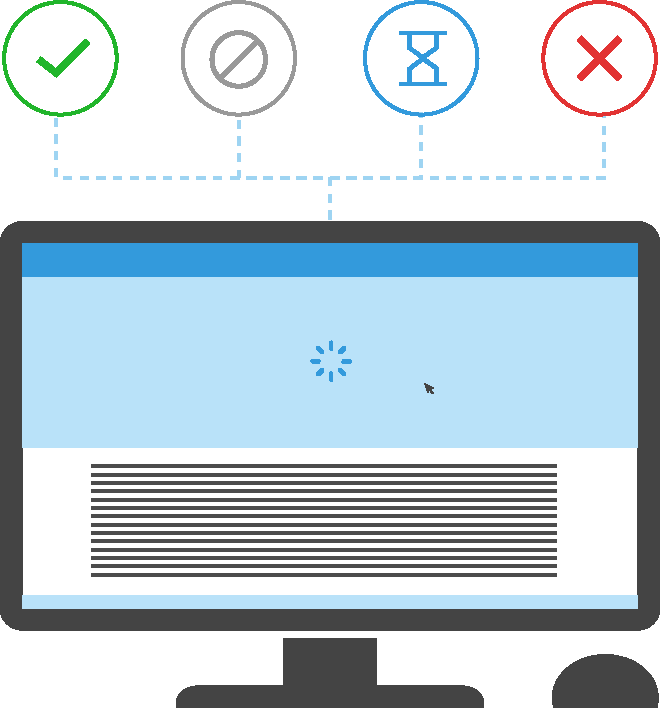
-
1. Successful transfer
Occurs when data transaction push through.
-
2. Cancelling transfer
Whether using PayCo wallet, Credit Card, China Union Pay, Wire Transfer, PayCo gateway will return a status of 3 and 0 for credit cards.
-
3. Failed transfer.
Occurs in Wire transfers and returns a status of 2.
-
4. Pending transfer.
Occurs when the payment is being processed and returns an error. This is a result of several instances, API could be busy, data transmitted fails due to slow internet connections or expired sessions. Failed and cancelled transactions will not deduct or process payment.
The following are the POST variable passed to STATUS URL for the Merchant. The text in bold is the actual variable name:
| sign | Signed variable which is passed to the gateway in the process page. |
| wallet | Wallet used to deduct the payment. |
| desc | Description passed to the gateway. |
| amt | Amount of transaction. |
| curr | Currency of the transaction. |
| tid | Transaction ID passed in the process page to authenticate the Merchant. |
| trn | Transaction ID generated by PayCo for reference of the transaction as a hash string. |
| status | Status of the transaction. Values returned: 0 - error, 1 - success, 2 - pending, 3 - cancel |
| message | Message Status of the transaction. Values returned: 1 - Success, 2 - Pending, 3 - Cancelled, or depending on the result of the process. Failed message returns where the process stopped. |
| paytrans | If using PayCo Wallet paytrans is the PayCo Transaction ID. Otherwise, the Transaction ID from wire transfer, credit card and China Union Pay is returned. |
To setup the callback pages, please login to PayCo using your merchant account and click on the Merchant Dashboard. In the Dashboard, go to Settings. Please make sure that the URL exist in the domain of the URL. The URL should be valid for existing domains only.
Possible Failed messages
Payment was cancelled or process failed. |
No PayCo transaction processed. |
102 System Error. |
A transfer was not completed. Please check incomplete Transfer page. No transaction processed. |
103 System Error. |
Transfers cannot be completed. Please check Cancel transfers to cancel and try again. |
104 System Error |
Completing Transfer cannot be completed. Please check Cancel transfers to cancel and try again. |
105 System Error. |
Please contact support. No PayCo transaction processed. |
302 CUP Error |
No transaction processed. |
303 CUP Error. |
No transaction processed. |
304 CUP Error. |
No transaction processed. |
Using Credit Cards
| Country Code | use cc as hidden field id and name, format is ISO 3166-1 alpha-2 (2 character country code). |
| Registration Date of Client | use regdate as hidden field id and name, format is YYYY-MM-DD. |
| Name of Client using credit card | use name as hidden field id and name. |
| Email of Client using credit card | use client_email as hidden field id and name. |
| City | use city as hidden field id and name. |
Here is a sample html code snippet that you need to attach to your process page.
<input type="hidden" id="cc" name="cc" value="IN"><input type="hidden" id="regdate" name="regdate" value="2014-02-28"><input type="hidden" id="client_email" name="client_email" value="johndoe@gmail.com"><input type="hidden" id="name" name="name" value="John Doe"><input type="hidden" id="city" name="city" value="New Delhi">
The Shopping Cart is the Merchant Online shopping page. It contains the amount and currency that will be posted to the Process Page which also contains the HTML page that automatically submits the POST variables to the PayCo Merchant Gateway. It uses the POST variable names passed to the PayCo gateway. The Process Page is also a server side code in PHP, ASP classic, or ASP.NET. It contains the generated TID (Merchant Transaction ID) and SIGN (Signature). You can use 1 to 32 characters for the Merchant Transaction ID. Please refer to sample PHP code on how to create the page. You can also pass any variables to the PayCo gateway and retrieve the values on return to your site. PayCo will retrieve the "Return URL" in the Merchant Settings and post back the variables sent to the gateway. PayCo will then post back the unused variables passed. Make sure to post the form variables as a hidden field in the Process Page (for example, process.php). Below is an example.
The Shopping Cart page can use a form action, POST submit or an AJAX POST, to the process.php. Make sure to pass the amount and currency for payment. Use the variable name amt and curr as an input form variable or a hidden field in the process.php.
                            <input type="hidden" id="amt" value="100">

                            <input type="hidden" id="curr" value="USD">
Sample PHP Code
The code below is the process.php. Description (desc) can be passed from the Shopping Cart page or can be set initially.
                                        <?php


                                            $desc = $_POST["desc"];
                                            $curr = $_POST["curr"];
                                            $amt = $_POST["amt"];
                                            $MID = "987654321";
                                            $str = $desc.$curr;
                                            $TID = md5(uniqid()); // generate a 32 characters or you can supply a 1-32 characters.
                                            $MWALLET = "M123456789";
                                            $SEP = "X2345";
                                            $SECRET = "lenlen123";
                                            $SIGN = hash('sha256',$MID.$SEP.sprintf("%1.2f",$amt).$SEP.$curr.$SEP.$desc.$SEP.$TID.$SEP.$MWALLET.$SEP.$SECRET);

                                        ?>


                                        <body onLoad="document.form.submit();">


                                            <form id="form" name="form" method="post" action="https://payments.pay.co/payments">

                                                <input id="desc" name="desc" type="hidden" value="<?php echo $desc?>" />
                                                <input id="curr" name="curr" type="hidden" value="<php echo $curr?>" />
                                                <input id="amt" name="amt" type="hidden" value="<?php echo $amt?>" />
                                                <input id="MID" name="MID" type="hidden" value="<?php echo $MID?>" />
                                                <input id="TID" name="TID" type="hidden" value="<?php echo $TID?>" />
                                                <input id="MWALLET" name="MWALLET" type="hidden" value="<?php echo $MWALLET?>" />
                                                <input id="SIGN" name="SIGN" type="hidden" value="<?php echo $SIGN?>" />

                                            </form>


                                        </body>
Sample ASP Classic Code
Since ASP classic does not have a built-in function like PHP to generate sha256 encryption, you can click here to view sha256 class.
                                            <!--#include file="sha256.asp"-->
                                            Dim TID, desc, curr, amy, MID, str, TID, MWALLET, SEP, SECRET, SIGN
                                            Set objTypeLib  = Server.CreateObject("ScriptLet.TypeLib")
                                            TID  = Left(objTypeLib.GUID, 32)
                                            desc = Request("desc")
                                            curr = Request("curr")
                                            amt = Request("amt")
                                            MID = "326696920"
                                            str = desc & curr
                                            TID = md5(uniqid())
                                            MWALLET = "M007999028"
                                            SEP = "X2345"
                                            SECRET = "lenlen123"
                                            SIGN = sha256(MID & SEP & FormatNumber(amt,2) & SEP & curr & SEP & desc & SEP & TID & SEP & MWALLET & SEP & SECRET);
                                            %>


                                        <body onLoad="document.form.submit();">


                                            <form id="form" name="form" method="post" action="https://payments.pay.co/payments">

                                                <input id="desc" name="desc" type="hidden" value="<%= desc %>" />
                                                <input id="curr" name="curr" type="hidden" value="<%= curr %>" />
                                                <input id="amt" name="amt" type="hidden" value="<%= amt %>" />
                                                <input id="MID" name="MID" type="hidden" value="<%= MID %>" />
                                                <input id="TID" name="TID" type="hidden" value="<%= TID %>" />
                                                <input id="MWALLET" name="MWALLET" type="hidden" value="<%= MWALLET %>" />
                                                <input id="SIGN" name="SIGN" type="hidden" value="<%= SIGN %>" />

                                            </form>


                                        </body>